
U Do It Builds – DIY Lumber Rack using Steel
In this video I’m showing you how fabricating a DIY lumber rack using steel is possible, even with limited welding knowledge. I built a shed to store my extra materials and yard tools. I have some lumber and trim that I would like to store properly.
Jump to the full video transcript
Why I Didn’t Buy a Retail Product
Although there are solutions available to purchase, I want to fabricate my own out of heavy gauge steel tubing. There’s so much I want to learn about fabrication. And I know that forcing myself to do it is the right approach. It’s how I learned everything, including woodworking, software engineering, design, and more.
What you don’t see in this video is that I started this project last year. I bought the steel from Joseph Fazzio’s Steel in Glassboro. I also bought a used chop saw with carborundum discs from them a year ago to make this lumber rack. It works but it is not great, which is why I never finished the lumber rack. The cuts take several minutes each and they are not square.
Equipment Purchases
So I decided to purchase the Evolution S355MCS miter saw, which would give me the accuracy I needed. Besides, this was the required tool for me to build my DIY Plasma CNC over Christmas break. The saw is built well and cuts steel tubing perfectly within seconds.
I also purchased a used 15-inch Craftsman drill press last year. The drill press was the perfect tool for drilling the bolt holes for mounting the brackets on the studs in the shed.
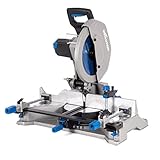
- 14" Mitering Chop Saw for Metal Cutting: The Evolution S355MCS 14" Mitering Chop Saw is designed for metal cutting professionals, offering precise, repeatable cuts with a TCT blade and adjustable mitering base—perfect for steel cutting and metal fabrication.
- Powerful 15A Motor with 1450 RPM: Equipped with a 15A motor and 1450 RPM, this saw provides consistent power for cutting metal, steel, and heavy-duty materials with ease, ensuring high performance in demanding applications.
- Dual-Sliding Cast Iron Clamps & Top Clamp: Featuring dual-sliding cast iron clamps and a top clamp, this mitering chop saw offers stable clamping and secure workpiece positioning for accurate metal cuts on large or irregular pieces.
Amazon.com Price last update on 2026-11-11 - Details(This link opens in a new window)

- typical applications to include lap and butt welds on galvanized sheet metal
- joining of galvanized roofing sheet metal
- Package Dimensions: 4.7 L x 10.5 H x 10.1 W (centimeters)
Amazon.com Price last update on 2026-11-11 - Details(This link opens in a new window)
The steel pieces were either rusted or had mill scale on them. I used the Restorer with a rust removing drum to clean the areas where I would be welding the pieces. I love this tool as it makes removing paint, rust, and mill scale super easy.
Then I used my Lincoln Electric 210MP to weld the pieces together using Blue Demon E71TGS flux cored welding wire. Not shown on camera was some frustration with welding, like running out of welding wire, welding the wire to the welding tip, bird nesting inside the welder, and using the incorrect settings on the welder for the thickness of steel being welded. Once I got my settings dialed in, I was able to apply a better bead of weld.
Was It Worth It?
I felt like this project was totally worth the trade off for the price of materials and the tools for the experience gained. I’m a hands on learner and I need to make my mistakes and adjust.
Now onto the next project, which is building my Plasma CNC.
Video Transcript and Chapters
Video Transcript: U Do It Builds – DIY Lumber Rack using Steel
Introduction of U Do It welding one of the rungs of the lumber rack to SPARK interest in the rest of the video
and I’m going to make uh shells for wood and we’re going to use this 2x two steel
last time I cut this I used my abrasive uh chopsaw with a carborundum disc and it was not accurate at all and I’m like you know what I really need to get this Evolution saw so here we
are and we’ll put the guard on
[Applause]
this clamping system is
great see how clean that is here now we got to get this line lined up where we’re going to
cut take this see if we can position this over
here see if that makes a
difference and the reason why I did that is cuz I wanted more Force down here on this side since it’s such a long piece and it’s can levered off of the the base that I saw
[Saw cutting through the steel tubing]
yeah look at that nice Cut look it’s magnetic
[Using a large drill bit on drill press to drill through the tube so it can be mounted against the side of the wall stud]
and now we have um now we got two holes so this will be the top this will be the bottom part
I have all my stock cut I’m about to do the layout now all right so I ran out of the the fleux square wire that came with the unit so I purchased um some blue demon
here yeah no chase you know we’re not rocking with that lactose baby yeah push that da product all the way to the side come on yeah yeah yeah uhhuh yeah no cheese uh-huh cheese ful lact up here [Music]
likees right so after troubleshooting a lot I discovered that my feed rate or the gauge metal I’ve selected which within the 210 MP welder was not correct and that automatically sets the feed rate and the um voltage so I set it to 16 or I set it a 10 gauge which is 1/8 in and it seemed to work a lot better I still have issues with my welding I just got to get better at welding but this is some of the uh some of the beads that I I was able to set with that new setting
[Music]
so this table right here here’s 8 inch and then we have steel self shielded which is fux s and you come over here and it’s 219 so it’s a cross reference of this one and this one here that meet up to right there at that value 219 so I discovered that and I was like wait what how do I get to that previously I thought I could only go to like 18 gauge but I didn’t keep turning the dial for some reason to discover that I could keep setting it and this will do all the way up to 38 but for fux core it only goes up to 516 on this
machine and then this is the blue demon uh fleux cord wire that I’m using you can see I already used a significant portion of that wire cuz that was all the way up to the top all right today we are installing the lumber rack I have six pieces of lumber rack brackets that I welded up and we’re going to mount them on the stud I think we’re going to go every other stud so we’ll start at the second stud in on the wall behind the camera there and the tools I’m using today [Music] are uh drill bits I have my impact driver with a 3/4 in socket on it
a lot of effort just to get it there two part two-part process [using impact driver to force bolt through stud and steel tubing hole]
all right this is my work pro uh pry bar set [removing romex clips with it]
set here we go CU we’re going to drill a hole through here and I don’t want the drill to hit nothing yeah so the work pro thing worked well all right so now we got to remove this bracket that’s up
there all right so this is the work pro sucket set I Ed this several times I’m going to use the quarter inch bit Swap this out easily [Applause]
[drilling holes through stud for bolts to go through stud and into tubing and using clamp to secure to stud while U Do It does it] well
[making sure it is level and feeding the bolts through] w
[Music]
[Applause]
here we go this is the test the real
test yeah [testing the rack by putting some boards onto it followed by lots of grunting noises made by U Do It]
[Music]
all right we have four sections of the lumber rack installed it’s already working out well really happy with how it worked out my welding skills are improving once I got the feed rate set and the voltage set for the gauge metal that I was welding 1/8 in that’s what this is uh the beads were coming out better my welding technique can improve that’s going to come along with practice that’s why I forc myself to do this because I’m doing something that I’m uncomfortable with I’m uncomfortable with welding but I want to become better only way to become better is to keep practicing watch videos talk to people who are experts show them your welds let them give you tips so that’s really the purpose of this was the weld I could have built this out of wood but to me that would have been boring cuz I’ve built things out of wood my whole life I’ve never really built anything out of metal using welding so this is a new a new skill that I want to really improve upon so yeah little bit of I think uh I don’t want to call it [Music] Ingenuity Innovation it’s not really Innovative what I did but I saw a vision and I brought up the life so yeah you can too I don’t do it you do it
all
right
Video Chapters
0:00 Introduction to the Evolution S355MCS 14″ Miter Saw
0:50 First cut on the miter saw
1:15 Clamping 2″ steel tubing onto miter saw
2:20 Drilling bolt holes
2:53 Using Restorer to remove mill scale and rust
3:05 Welding
5:03 Welding parameters table
6:09 Installation of the lumber rack brackets
9:27 Storing wood and trim on the rack
10:17 You can build this lumber rack too
“As an Amazon Associate I earn from qualifying purchases.”
Video Credits:
Video Production: U Do It™ Studios a Division of No Cheese Records LLC All Rights Reserved. No Cheese Records® is a Registered Trademark of No Cheese Records LLC All Rights Reserved.
Music Credits:
Bigginz Group Therapy(opens in a new window)
Associated Performer, Featured: Northside Nate
Associated Performer, Featured: Savvy Turtle(opens in a new window)
Composer Lyricist: U Do It(opens in a new window)
Producer: No Cheese Records(opens in a new window)
Publisher: Bigginz Publishing(opens in a new window)
Studio Personnel, Mixer, Recording Engineer: Northside Nate
Picked out for you
U Do It Gutter Cleaning Quest – By U Do It
Repair a Leaky Gutter with Flex Seal – By U Do It
Cleaning Two-Story Gutters with a Pressure Washer – By U Do It
How to clean siding on a 2 story house with a pressure washer – By U Do It
Do It Yourself Build a Shed – Using a Telescoping Plank for Roofing – By U Do It
My Pressure Washer Won’t Stay Running – How to Fix – By U Do It
My Pressure Washer Won’t Start – By U Do It
Replacing an Edger Blade is Easy with the Right Tools Video – By U Do It
DIY Acoustic Panels for Better Sound Treatment – By U Do It
Garage Door Won’t Stay Opened Unless I Hold the Button Down – By U Do It
Save money by rebuilding your grill burners – By U Do It
How to install a GFI outlet in basement from start to finish – By U Do It

How to Remove Car Pinstripes using an Eraser Wheel – By U Do It
Design of the Day

Savvy Turtle – Afterlife(opens in a new window)(opens in a new window)
Follow U Do It on Social Media
 (opens in a new window)
 (opens in a new window)
 (opens in a new window)
 (opens in a new window)(opens in a new window)
 (opens in a new window)
 (opens in a new window)
 (opens in a new window)
 (opens in a new window)
 (opens in a new window)
 (opens in a new window)
What’s next? Check out About U Do It, History of U Do It, and Mrs U Do It to learn even more about U Do It.
