
Do It Yourself or Hire a Contractor
There are many factors that can sway ones decision to do it yourself or to hire a contractor. We’ll dive into some of these as they may help others determine the better path. You are responsible for your own decision and this is only a guide to help you consider what things you need to navigate. It is highly recommended that you consult a licensed professional.
Sample Project – Finish Your Basement
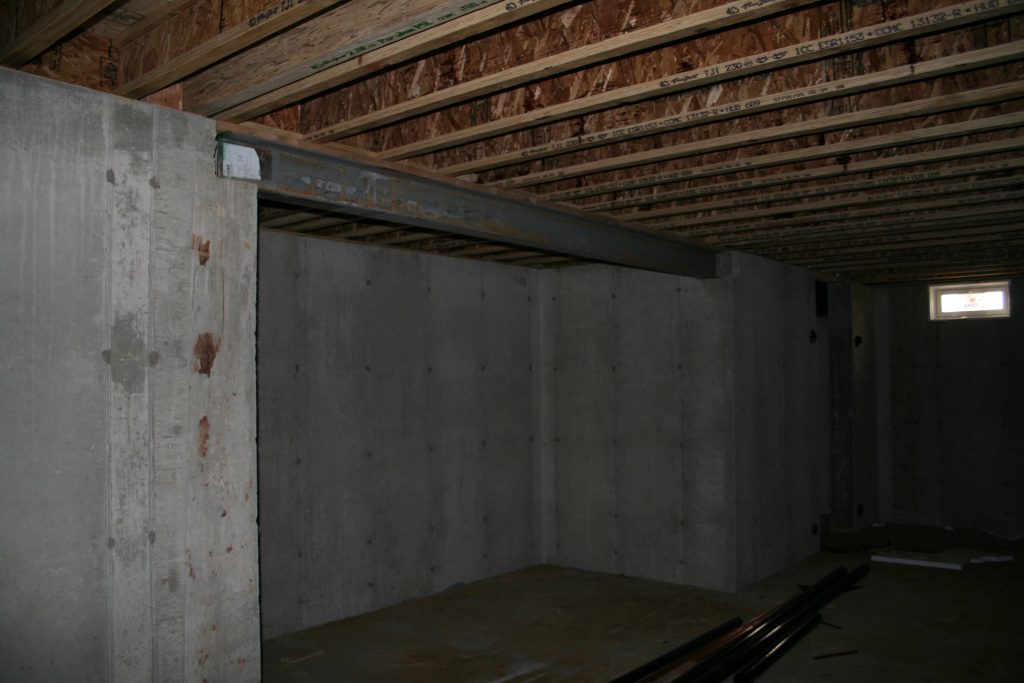
To make this article more meaningful we’ll choose a project: Finish Your Basement. In this sample project we have a basement with stairs from the kitchen above with concrete walls at the foundation level. The continue all the way to the basement with 9 foot high foundation walls up to the bottom of the ceiling joists. There’s an area that is 15 foot x 15 foot at the base of the steps that contains a home run for structural wiring, a load center (breaker panel), a sump pump with the output going out through the rim joist above the foundation, a hot water heater and the downstairs HVAC unit.
There is some ductwork on the ceiling, but for the most part it is confined to specific areas in the ceiling or in between floor joists. Beyond this 15 x 15 area is a large footprint 30 foot x 30 foot area and a small 15 foot by 6 foot bump out. The concrete floor is a floating concrete slab. There is sewer that runs along the wall in the 30 x 30 area and a radon vent in the floor that exits at the rim joist above the foundation.
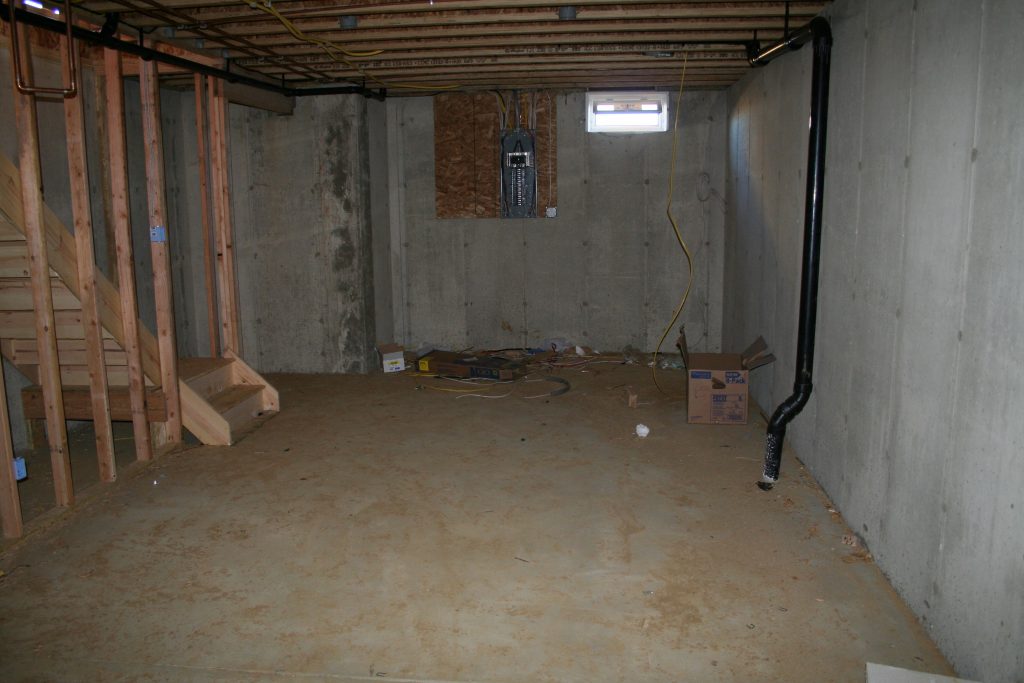
This is your typical McMansion basement floor plan that you want to turn into a home theater with some extra storage where the utility rooms are. This was our previous home that I finished myself and a little help from my cousin at a time in need.
Project Scope
My project scope was to place a projector screen where the bump-out wall is located and paint the walls flat black to reduce or eliminate reflection. I also wanted to install a raised platform with two levels for theater seating. There was a requirement for three separate storage areas, two of which were necessary to enclose the utility areas and the third was necessary just to provide extra storage. I wanted a drop ceiling as I wanted easy access to the floor joists for running wires if necessary. And I wanted sconces on the walls that were dimmable for proper lighting.
Your Budget
It is best that you know what your budget is for a project prior to embarking on it. Once you have your budget established you’ll want to plan what you need to purchase. Planning is key and this will require an actual shopping list of tool purchases / rentals, building materials, supplies and permits. You won’t know this until you do your research combined with your current tool inventory.
Your Plan
The problem with Do It Yourself for me at least is that I didn’t have a plan for this project. I had a vision of what I wanted to do and it was a vision that I was willing to agile develop as I went along. I would not be able to work with a contractor as I would drive them crazy with change orders, which in turn would eat away at my limited budget. But, I needed a plan because I needed to get permits. When you file a permit you need to have a scope of work described, which a sketch of the plans along with a cost estimate of materials. Since it is your sweat equity, you’ll just need to tally up the cost of materials.
Building Permit
The building permit is the most basic permit and covers building and renovations. Depending upon the type of building, you may need additional permits such as plumbing and electricity. Interior work such as finishing the basement in this project did not include plumbing since we were not including a wet bar or a bathroom. We had plans of the basement layout that were included with the home when we had it built. These include the dimensions of the basement footprint and rough locations of the utilities, e.g. hot water heater and HVAC. I had to prepare an updated drawing, which I drew in AutoCAD, that showed the footprint of the basement with near exact measurements. I had to include the walls and doors that were to be added.
On the building permit I had to include the measurements of the partitions (walls) and indicate where lighting and their respective switches would be. This same plan was used for the electrical permit but was required at this stage so that the code enforcement officer could verify that the electrical code was being followed. Regardless of the electrical code, some code enforcement officers exercise their own rules and ask for things beyond code. It is best to oblige unless you are ready for a fight that you may not win.
Purpose of the Project
When stating the purpose of the project, you need to be clear on the purpose of the room. Is it to provide additional living space where someone would sleep, is it for storage, a home gym or for entertainment. The answers here will determine if you need to do extra work to remain in compliance with the construction code.
For instance, our basement had walk out steps with doors that covered the steps. If our basement didn’t have this, I would need to install an egress window or door that would allow someone to escape the room in case of a fire. This additional cost could be $10,000 or more since the basement wall would need to be dug out, a hole cut through the concrete and a window or door installed. The dug out area would then need to be reinforced and possibly a drain with a sump pump installed to remove any water that could enter the area from rain or snow.
Example Purpose of the Construction
And if you add an additional bedroom and you have a septic system this additional bedroom would exceed the capacity of your as built septic system. In case you didn’t know, a septic system is designed and rated for the number of bedrooms. The number of bedrooms translates into the maximum number of occupants, which is used for an average calculation for the number of times the toilet flushes, the number of showers or baths and the amount of times the sink or dishwasher would be used. You may need to factor in the installation of a new septic system depending upon what your additional building purpose is defined.
Your additional space may require additional heating and cooling capabilities beyond what you have already built into your home. For the finished basement, a mini-split may be all that is required to solve your problem. However, this mini-split size may effect your electrical permit.
Fire Blocking Permit
A fire blocking plan may be required in your town or city. This is an additional permit that requires an extra level of inspection at various stages. Fire blocking is an important concept and increases the amount of time it takes fire to travel. Sometimes, fires can extinguish themselves in properly fire-blocked areas. All annular openings (holes) need to be fire-blocked and any openings between walls need to be sealed every so many feet.
On the fire blocking permit you’ll state where you intend to apply fire blocking. For instance, on my plan I had a soffit that was 30 foot long that ran the middle of the ceiling from the HVAC to the other side of the area. The maximum fire blocking distance at that time was 20 feet (it appears that it may still be 20 feet). Since we were erecting studded walls along the foundation there was a gap between the studs and the concrete wall. There was an even larger gap between the studded wall and the concrete where the sewer line ran along the wall. This is why I mentioned the sewer lines, the duct work and the radon gas pipe as these areas need to be built out and fire blocked.
The area between the rim joist, the floor joists and the top of the foundation to the bottom of the floor also needs to be fire blocked. These areas can be filled with any permissible and approved fire blocking material. It is up to you and you can change on the fly based on any particular reason.
Fire Blocking Hidden Costs
In the end, everything needs to be fire blocked as required by code. There are hidden costs here that can add $1,000 plus to your budget very quickly. For example, bats of Roxul Mineral Wool insulation at the time of this project was $36 per bag. Now, this same bag costs $75 in 2022. It comes with 12 bats that measure 3 1/2 inches by 15 1/4 inches by 47 inches.
Approved Fire Blocking Materials
Things change as the fire code is updated and better methods are identified. This is not a complete list of approved fire blocking materials but this is some of the materials.
Mineral wool is a great fire blocking material. It not only eliminates drafts but also deadens sounds that travel through walls.
Drywall itself is an approved fire blocking material and can be used in conjunction with other fire blocking materials to create sealed bays every 20 feet on a wall.
Fire caulk is a calk that is fire blocking rated and can be used to seal around junction blocks, fill annular holes and seal around registers and plumbing.
Fire blocking foam is a foam that is fire blocking rated and expands to fill holes. Usually, one product is not sufficient and multiple may be needed just for one type of fire blocking effort.
Electrical Permit
An electrical permit is required for any additional or building since a new space will require outlets, lights and possibly appliances. Do-it-yourself work with electrical can get tricky and it is best to familiarize yourself with the NFPA’s National Electrical Code (NEC). This is free and is available from the NFPA’s website. It is worth reading from front to back, even though it is lengthy. Many of the sections deal with commercial and industrial applications. But, throughout there are sections for residential and multi family and mixed occupancy structures.
Your home is built based on the initial plan, which states how many kitchens you have, the types of appliances, how many HVAC units you have, how many lights you have, etc. Based on this information a licensed electrician performs a load calculation and determines the minimum size of the electrical service required for your home with the given specifications. When building onto your home, one must consider the purpose of the additional space. If it is for storage, this is not a problem. But if it is for living, then this could be an issue. If you want to add a dishwasher, a stove, an oven, a microwave now we are entering into a potential sublet issue but no doubt this will tax your electrical system.
I published a video in 2017 describing a way on how to fill out an electrical permit. You can see this video “Do I need a Permit for Electrical Work” here.
Demolition Permit
This may be outside of the scope of this example but I’m raising this as a concern that you may face. You may need a demolition permit if part of a structure is to be removed to make your improvement. For instance, the example where I stated that you are finishing your basement but an means of egress is required in case of a fire. This will require that part of an existing wall be removed or demolished. You are changing the structure of a buildings core foundation with the intention of strengthening it before adding the window or door.
In a single family home in a rural area the demolition is between you and the town. But in a crowded city in a multi-family dwelling, the demolition can have consequences that exceed your wildest nightmares and change the lives of you and your neighbors forever. I’m sure you heard of housing collapses in cities even where the proper permits were pulled. Sometimes even the best experts can have unforeseen occurrences.
Drywall Permit
At the time when I finished our basement we were required to have a final inspection once the drywall was complete. Since that time, this is no longer the case and we are not required to have a permit for drywall. However, a final inspection would still be required to give a final look over the project compared to the specification.
Dumpster Permit
Did you know in some towns and cities you may not be able to have a dumpster? And in some towns and cities you are required to apply for and purchase a permit for construction debris from renovations.
Construction Debris Permit
In some towns and cities you may not be allowed to throw your construction debris in the trash. Your renovation may not qualify for a full sized dumpster but will require removal from your premises. Some of these towns and cities offer an service that you need to purchase. It could be on a per project basis or it could be limited to a finite number of bags per year. Once your quota is reached you need to seek alternative means to dispose of construction debris. If you only have a Prius as a vehicle there are more hidden charges for you to deal with at a later time.
Other Permits
Your town or city may require a fire suppression system be installed, e.g. a sprinkler system that will spray the area if fire triggers the valves. Check with your town or city construction office to verify the need for this. You may also be required to install a temporary fence barrier to catch any construction debris that might be caught in the wind. Such requirements are not lmited to but usually exist surrounding water ways or protected lands.
HOA Rules
An HOA can be one of the worst features of a development to deal with and some have rules that dictate what you can do to your property within your own home. It is best to check with your HOA bylaws to determine if this is the case. You do not want to embark on an expensive project only to find out that you need to put everything back the way it was and lose money on wasted time and material.
HOA Example
A good bad example of this is someone we know decided to build an addition on their house. The permits were filed all the way through and approved and building began. Four weeks into the project the foundation was dug and poured and the walls were being built. The homeowner received notice from the HOA that this addition was not approved. The construction office should not have accepted the permit but that was beside the point. In the end, the homeowner decided to abandon the project and had to fill in the hole and lost out on the cost of the construction deposition, plus time and materials that were purchased to complete the job.
Do yourself a favor and check everything prior to going forward with building.
Your Time
When building yourself it is taking your time to build. If you have a family, you are employed, you have additional responsibilities then this may be tough to navigate. Your project could take several years to complete once you begin. This is the sweat equity where you can improve the value of your home. You can improve your quality of life at home based on your time and effort. If you only have 10 hours a week to invest in building, it will be challenge to finish a basement alone. However, a vision and a good plan will help to keep things on track so you can see this project to the end.
Your Abilities and Experience
Are you experienced with building walls, running romex cable, making decisions on how many wires can pass through a single annular opening? Are you experienced with operating pneumatic tools such as a framing nailer and their required maintenance? How about the safe operation of a framing nailer or a palm nailer? Do you know the best practices for building our walls with the studs so that the drywall breaks on the middle of a stud?
If you are willing to learn these as you do them that is fine but be prepared to make some mistakes. Learning these things will increase your risk. That is why apprentices work under a mentor who guides them as they work in the field. The mentor passes down this valuable knowledge over time and eventually the apprentice graduates to the next rank. The best you may be able to do is ask advice of friends and relatives in the trade or consult YouTube videos.
Your Risks
Every time you swing a hammer, walk around in the work-area, climb a ladder, cut drywall, cut studs you are assuming the risk involved with the activity. What could go wrong? You could fall from a ladder and break a bone. You could get injured or maimed while using a saw. These are risks that affect your other aspects of life, including your ability to work if your employed. You can reduce your risks by taking proper training that some contractors take at vocational technical schools for the trades. Training can help your understand how to properly use tools of the trade, how to spot safety issues and reduce or eliminate them.
For instance, I would regularly have extension cords and air hoses strewn throughout my construction area. Although it may be unavoidable at times, this is a dangerous practice that can be mitigated through vigilance. As you are working in an area, constantly scan the area prior to even turning around. The act of turning around while walking could change your life in a hazardous work environment.
Absolutely Not
You will not see me get on a roof unless it is super low pitched. I will hire a contractor to work on my roof before I do any of that myself. As I say in my other posts, if you are uncomfortable with any aspect of a job seek the help of a licensed professional to do the work for you. What are some areas where you know you won’t go? Write these down as you may need to budget for these pieces of the job.
Your Tools
Do you have the tools required to do the job in the most efficient manner? One doesn’t need a $600 framing nailer and air compressor combo kit to do a job. A hammer and nails will work just fine. But, will the framing nailer make your job easier? One could argue that buying these tools is still cheaper than hiring a contractor and it gives you the opportunity for the next job to be more efficient.
But, there will be that one thing you need to accomplish and require a tool that is not optional. Although it won’t be necessary to buy the modern version of a saw it may be enticing to do so. Don’t feel compelled as I do to purchase modern tools where hand tools would suffice just as they did for generations prior to yours. Again, the trade off may be time but the reward may be a sense of a greater accomplishment.
Oh, and buying tools requires a place to store said tools. Do you have adequate room for an air compressor, a miter saw, a router, a table saw, a planer, ladders, rolling scaffolding?
Recommended Tools
I can’t cover every job type so we will continue to focus on finishing the basement project example. Here’s a list of tools that I suggest you should have at a minimum. But keep in mind you can also purchase the hand tool equivalent of some of these. The cost of these tools if you have none will be around $5,000 to $10,000 purchased new. You can certainly find many of these tools used at a reduced cost. I also do not mention carpet or tile tools and this is dependent upon the type of flooring you install. Carpet is a job I was never inclined to do on my own and always hired out for this type of work.
Personal Protective Equipment
- Eye protection
- Ear plugs
- Knee Pads
- Construction / demolition gloves
- N95 masks
- Dust masks
- Steel toed boots
Vacuum
- Shop-Vac workshop vacuum or equivalent with 2 1/2″ hose
- HEPA Filter
- Shop-Vac Reducer set to connect shop-vac to mitersaw
Levels, Lasers and Measurement Devices
- Plumb Bob
- Torpedo Level
- 4 foot level
- 7 foot level
- Angle Finder
- Protractor
- Laser Level like the Bosch one used in this video
- 35 foot tape measure
- Speed Square
- Machinists Square
- Chalk line (blue chalk)
Saws
- 12 Inch Compound Miter saw
- 10 Inch Table Saw
- 7 1/4 inch Circular Saw
- Drywall Saw
- Rotozip
- 12 Inch 80 Tooth Finishing Blade like the Diablo
- 12 Inch 44 Tooth Framing Blade
- 10 Inch Ripping Blade
- 7 1/4 inch multi purpose blade
- Reciprocating saw
- Assorted set of reciprocating demolition blades
- Jig saw
- Assorted set of jig saw blades
Drywall Tools
- 6 inch drywall knife
- 14 inch drywall knife
- Drywall mud scoop
- Drywall mud mixer
- Tin Snips for corner bead
- 16 inch stainless steel Mud pan
- 13 inch square aluminum hawk
- Drywall sanding pole and pad
- Utility knife
- Drywall Square
Drills, Drivers and Drill Bits
- 1/2 inch battery powered drill
- 1/4 inch battery powered impact driver
- 1/2 inch hammer drill if boring holes in concrete
- Drywall Bits
- Wood boring bits
- Impact driver bits
- Masonry bits if boring holes in concrete
Workbench or Table Tops
- Saw horses
- Mitersaw table
- Roller feed for table saw and miter saw
Nailers, Hammers, Compressor
I list pneumatic tools but the battery powered tools are in some cases just as good or better. You may be able to avoid the air compressor completely.
- Compressor
- 3 1/2 inch pneumatic framing nailer
- 2 1/2 Inch 16 gauge / 18 gauge finishing nailer
- Palm nailer
- Claw hammer
- Demolition bar
- Compressor
- 100 foot air hose
- Nailset (for finishing nails)
- Chisel Set
- Ramset shot nailer
Ladders and Scaffolding
- 6 foot fiberglass ladder
- Rolling scaffolding
Lighting and Extension Cords
- Portable Lighting
- Heavy Duty Extension Cords with 10 AWG wire
- Multi Plug adapter to fit multiple devices
Electrician Tools
- Journeyman Pliers
- Long nose side cutting pliers
- Diagonal cutters
- Wire stripper
- Romex Stripper
- #2 Square Screwdriver
- #2 Philips Screwdriver
- Spade Screwdriver
- GFI/AFCI Tester
- Fishing Tape Reel
- Digital Multimeter
Painting Tools
- Paint Roller
- Paint Roller Tray
- Paint Brushes
- Painters Drop Cloth
Misc. Tools
- Clamps like the Jorgensen E-Z Hold Clamps
- Hand plane
- 10 oz. caulk gun
- 28 oz. caulk gun
- Carpenters Pencil
- Tool belt
Their Estimate
When working with a reputable contractor you’ll ideally hire one who charges for estimates. This means that they value their time and you do as well since you are willing to pay someone for an estimate. The free-estimate gimmick in my opinion is a horrible trend that still plays out today. Having said that, finding a reputable contractor is difficult enough and word of mouth is about the only reasonable reference one can rely on.
When you ask for a contractor to provide a free estimate sometimes they are factoring in things that they need because they simply aren’t good at managing their business. An example might be a bad deal from a prior job that didn’t go so well and they are short money. They figure they can make it up on your project and see you as the bank. How many times can a contractor do this from job to job? I expect most contractors don’t think this way but I know there have to be some who do.
There’s also some truth in not accepting a super low estimate because the quality of work will not be there. It is impossible for someone to do quality work for super cheap unless they have no reason to work and are purely in it for the joy of their craftsmanship. The undercutting contractors may cut corners putting your project and possibly your lives in danger. Be weary of those who do not respect their value for their time in exchange for your money and appreciation.
Their Plan
When you hire a contractor to provide an estimate you are asking them to formulate a detailed plan that you own. This plan is one that you can use to do it yourself on your own without the contractor’s involvement. It is not what I’m suggesting to do as I’m stating what you get for your investment. This plan will most likely include all costs associated with your request as well as the required permits. Being upfront and truthful (truth comes in the form of correct and complete) with your request is very important. You should expect the contractors plan to address your request and offer a solution as well as options to improve the project.
Expect that their plan provides a starting window and estimated time to completion. The plan should also include what permits are to be filed and when inspections will be performed. Their attention to cleanliness is important. They will need to demonstrate how they will keep the other areas of your home clean while they operate in your work area. Do they show examples of isolating areas with plastic, protecting hardwood floors with specialized traffic protection and managing dust? Here’s a list of some things to consider:
Insured and bonded
You need to call their insurance company and bond company to verify compliance
Permit Filing on your Behalf
- Demolition Permit
- Dumpster Permit
- Building Permit
- Electrical Permit
- Other Permits
Interior Property Protection and Personal Safety
- Dust mitigation
- Flooring protection
- Construction area isolation
- Covering HVAC vents
- Closing off doorways with sealed doorways, such as Re U Zip.
Exterior Property Protection and Personal Safety
- Construction vehicle parking
- Respect for neighbors property
- Protection of landscaping
- Use of mats for heavy equipment to minimize damage to grass and lawn
- Transplanting of bushes, shrubs and plants that are important to you in the work area
- Protection of Septic System
- Walking across a septic field is acceptable but moving heavy equipment over the system is not. What steps is the contractor taking to protect against damage?
- Driveway
- Depending upon your type of driveway, it may not be able to handle large equipment
- Concrete Delivery
- where can the concrete truck park?
- Will you need to wheel barrow the concrete loads to the work area
Their Time
When the work begins it is their time and not yours. It is also their decisions and not yours. Getting involved in the decision making process for a contractor may make you automatically become the general contractor. Check with your lawyer familiar with construction code to determine if this is true in your town or city. As the general contractor you may be the responsible party for any issues that arise. It is best to leave the professionals to be the professionals that they are. However, if something doesn’t look right you certainly have the right to fire them on the spot. Be willing to observe from the sidelines and answer any questions they may have.
Although it will cost extra, be ready to make a change order if you are not satisfied. You will be kicking yourself later if you accept something you don’t like about the way the project is going. Perhaps you do not like the lamp choice or the paint color. These are very easy change requests. A larger example of a change request is one that requires moving a window that was already set. Another example could be changing the location of a door that was already hung. If you have the budget and you know you will not be happy then make the change request.
Their Experience
Contractors charge for their experience to get the job done right for you and meet or exceed your expectations. They can still get caught off guard with complications but their experience will help them find a fitting resolution. Besides, they amassed an army of contacts they have done business with who can help them solve specialized issues. Do it yourself work will be a problem the minute you discover termite damage. What if you encounter a cracked or sinking foundation, rotten floor joists, a water leak or mold or mildew? Chances are good that you do not have this army of contractors like they may.
Their Risks
Validating the contractors insurance and bond is very important. Being given a piece of paper is not sufficient proof as anyone can make something look official. One would assume that at this point you did all that you could and you are not liable. You will need to consult an attorney to verify this as this.
Their Tools
A contractor typically has all the tools at their disposal to perform the job in a timely manner. As mentioned before, you can purchase that modern tool to do the job quicker as a do it yourself. Or, you can hire a contractor with the modern tools to get the job done quicker.
Buying tools for do it yourself can blow a project budget out of the water. However, the tools could become useful for a later project. Again, it is a trade off that you have to consider. Hiring a contractor removes the need to buy tools.
The Trade Offs
The trade offs for Do It Yourself or Hire a Contractor involves many factors. Do you have the determination to see a project through to the end that will be wrought with challenges? How about one that is filled with endless complex scenarios that take you out of your comfort zone? If so then this is something you may want to consider. If not, then you may want to hire a licensed professional contractor. I am not telling you which way to choose but rather giving you some guidance. You can use this guidance to discuss with a professional to help you determine on your own.
Do you have the budget to hire a contractor? Or do you have just enough to do it yourself with guesstimate on what overages you may encounter? With inflation setting in the reality of higher prices increasing the cost of your project on a daily basis is a reality. Many contractors are wise to this now and factor that into the contract. And if you were dealing with this during the supply chain disruption from 2020 through 2022 (today) you’ll remember the soaring cost of building materials due to the high demand and lack of supply. What other factors can you think of that could affect your plan and budget?
The Results
No one is perfect and realizing this is very important. You may not be totally satisfied with the work a contractor performs. I believe there are trade offs here as well. Otherwise, you may lead a long life of constantly being angry because you cannot be satisfied. The same goes with your own work. Try to do your best by studying and being prepared. But, in the end you may just need to accept what you created. And to be clear, it is not acceptable to be satisfied with work that puts you or others in danger. As long as the work is safe and sound you may be able to accept the other not so satisfying results of your project.

Image from video “DIY Home Theater” on U Do It
Picked out for you

The Art of Doing without Knowing – By U Do It

Garage door wont close unless I hold the button down – By U Do It

My Pressure Won’t Stay Running – How to Fix – By U Do It
My Pressure Washer Won’t Start – By U Do It

Briggs & Stratton Pressure Washer Starts But Suddenly Stops – By U Do It

Replacing an Edger Blade is Easy with the Right Tools Video – By U Do It

Save money by rebuilding your grill burners – By U Do It

Repair a Leaky Gutter with Flex Seal – By U Do It

Replace your air filter as part of your regular maintenance – By U Do It
Design of the Day

Follow U Do It on Social Media


What’s next? Check out About U Do It, History of U Do It, and Mrs U Do It to learn even more about U Do It.