You want to build a shed but you are not sure what is required to do it yourself. You’ve come to the right place because I don’t know either. I’m kidding but in a way I’m not because each build is different than the one before. I’m sharing my plans as I design them and what steps I am taking. This will include the initial concept, to permits, to materials sourcing and including the actual building.
Why Do I Want to Build a Shed
I want my workshop back and too much space is being consumed by equipment and materials. These things could otherwise be stored in a shed separate from my garage. My workshop is my space where I can become creative but since we bought our home this area has become filled with more and more stuff. It is unsafe and it is not functional to me. I feel stifled when I enter the space and all of my creativity leaves my brain.
Shed Requirements
I want to build a shed that falls under the minimum requirements that does not require footings or a concrete floor. Footings are not a problem for me to dig but it will add an additional cost for auger rental, concrete and fasteners. And this would also add time to the project. For that reason I will choose a footprint that is less than 200 square feet. A 12 foot by 16 foot shed is 192 square feet and falls within the 200 square foot threshold. For a shed less than 200 square feet in size it needs to be placed on four (4) inches of crushed stone for proper airflow beneath the structure.
Shed Purpose
The purpose of the shed is purely for storage and I do not plan on doing any work in there. Therefore, I do not plan on running electric to the shed. If however, you did plan on running electric that would add an additional permit application for Electrical Permit. You can read what I have to say about that process here: “Do It Yourself or Hire a Contractor“.
Shed Style
The last shed that I built was 12 feet wide by 16 feet deep with 8 feet walls and an additional 6 feet thanks to a gambrel style roof (a barn roof). I expect to repeat this process on my current property since I am familiar with this style. It also provides a significant amount of storage. I also plan on adding an 8 feet by 12 feet loft within it for additional storage on a second level. This will give me 96 square feet of storage space for things like Christmas decorations and infrequently used but important items.

Permit Application
Every city or town is different and you should discuss this with the construction office to determine what is required. As mentioned in my article here “Do It Yourself or Hire a Contractor” I discuss the permitting process and what may be required. There is a basic set of requirements you will need to submit with the application to improve your chances of being approved. This list is what is required for my town but may differ from your town.
- Building Application Jacket
- Not required for my shed but would be required for a garage or possibly if I planned on running electric to the shed
- Building Application Form
- Not required for my shed but would be required for a garage or possibly if I planned on running electric to the shed
- Simplified Application Form
- Site Plan
- Shed construction plans
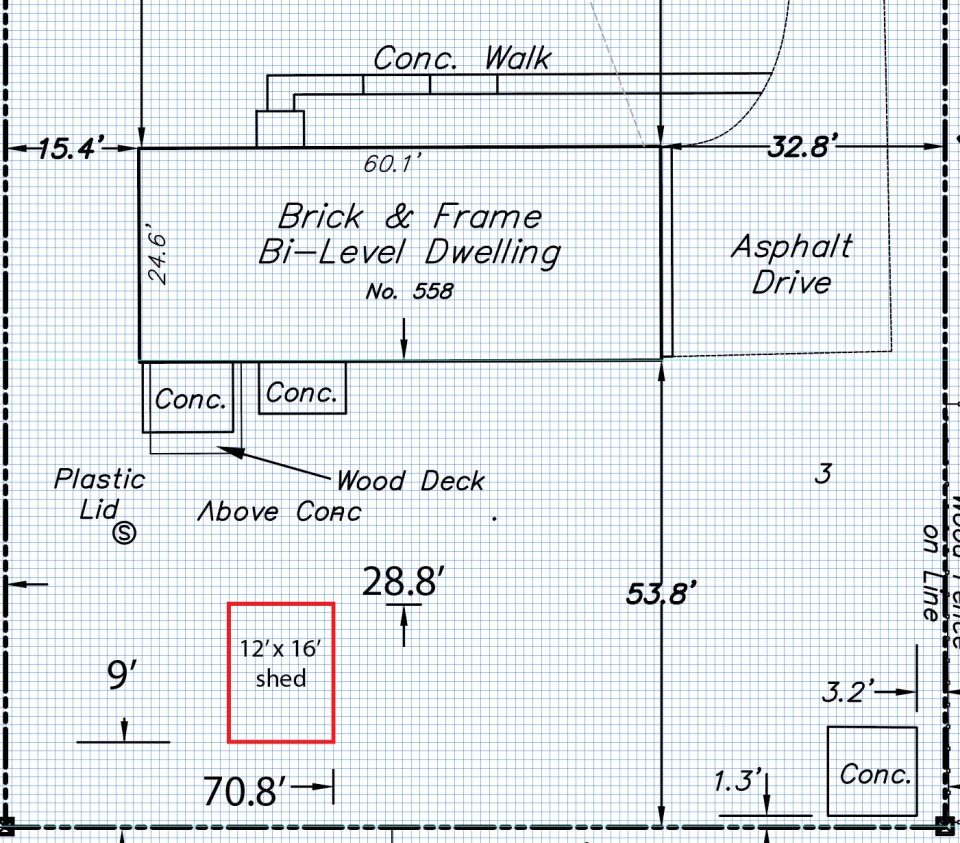
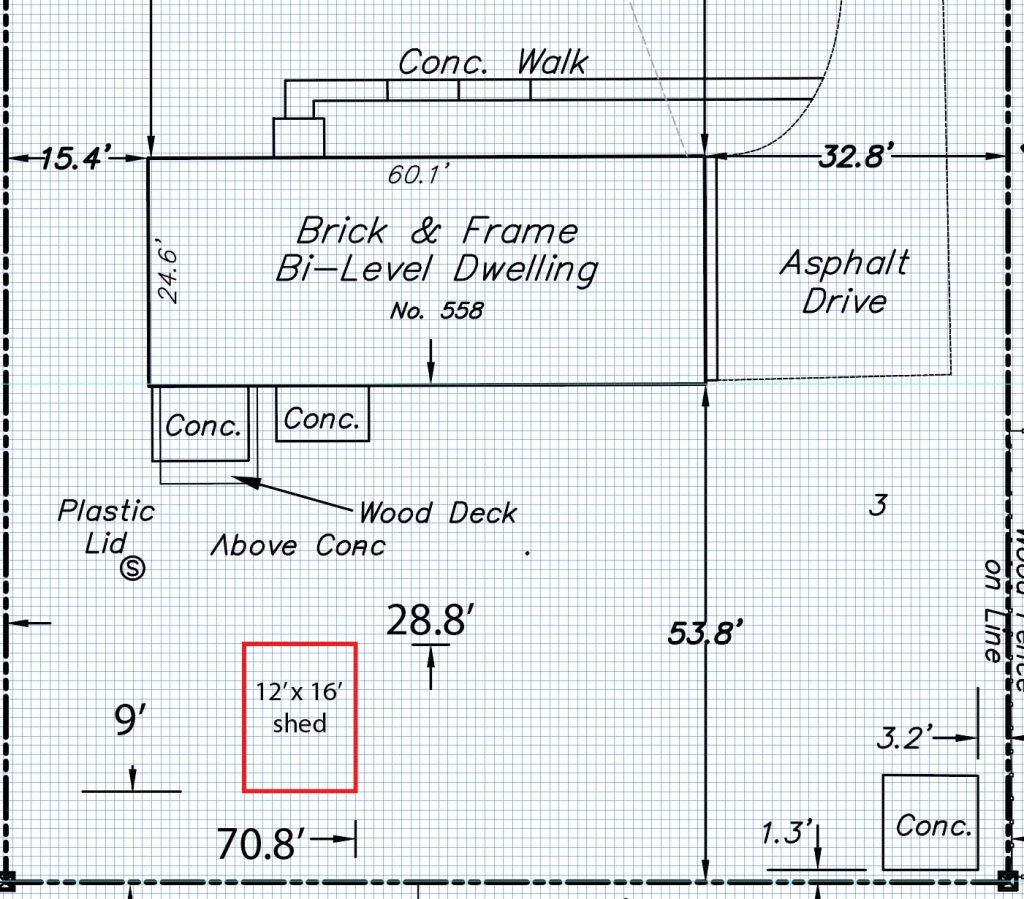
You will need a site plan, which is a drawing of your property lines and the proposed location of your shed. This site plan should clearly indicate the distance from any structures and your property lines.
Building Application Jacket
The permit application begins with the jacket, which is the folder that contains all of the relevant permit application forms, plans, evidence, variances, HOA approval letters, surveys, etc. This folder is imprinted with a form that is intended to be completed by you or by the contractor performing the work.
Building Application Form
Since I live in New Jersey I must adhere to the building codes that were approved in New Jersey. I also must adhere to any additional items that city or town or county have added. Some towns had issues with water infiltration in stucco and as a result these towns required additional inspections to verify all was done correctly. These requirements may have gone above and beyond the construction code but it was an effort to improve the integrity of stucco exteriors. This building application form is not required for my shed since it falls under the 200 square foot threshold (16 x 12 shed). My town has a simplified application form for basic sheds that I must complete. And since I am not running electric to the shed I do not need a Building Application Form.
Simplified Application Form
The simplified application form is exactly what it says. It is simplified and is not complicated. It is intended to provide the basic traceable information and evidence.
Site Plan
Below is a survey that was prepared by our friend who is a licensed surveyor. I used that drawing as the basis to add on my measurements indicating the location of the shed. As you can see the shed is located in the back yard. It is offset from the property line, which is termed as a set-back. For our town depending on the zoning of your property the setback can be either 6 feet or 10 feet. For our property the setback is 6 feet. We are placing the shed approximately 9 feed from the rear property line. This gives us any necessary clearance in the event that we made an error.
Shed Construction Plans
The shed construction plans provide drawings of the shed. This includes everything from the timbers placed on the crushed gravel up to the roof. It will not go into the details of the nail or screw schedule nor will it show the placement of the sheathing. However, if this were a larger building those details may need to be provided to show that you will be in compliance with the building code. And with a larger building you may be required to dig footings, which must be documented. This will not be covered here as this is a simple shed that falls below this requirement.
Gravel Foundation and Timber Placement
A gravel foundation may be one of the most cost effective types of foundations you can install for a shed. Before you submit your plans, you’ll need to pick the best spot on your property to place the shed. Ideally, this spot will be a area free of tree roots and left undisturbed for years. Also, it is best that this chosen spot is is not the lowest spot on you property where water sits for a long time. Sitting water can lead to mold, mildew and rotten wood, even if the wood is pressure treated. And the items that you store in the shed would be exposed to the damp air, the mold and mildew and could ruin your items.
The gravel foundation may need to extend at least one foot beyond the perimeter of the shed. In my case, my shed is 16 x 12 so my gravel bed will need to be 18 x 14. This will encroach into my 9 foot setback, which is fine because I am well within the 6 foot setback. The gravel foundation will be contained with a perimeter lined with 4×4 posts. Since the gravel foundation must be at least 4 inches thick this is sufficient. The specifics of a gravel foundation will be saved for a future article.
Getting Specific
A foundation plan may be required that shows the foundation size, it’s thickness and the type of construction. You may need to reiterate in your drawing what is called for by the city or town. This would demonstrate that your plans and intentions are in compliance with their requirements. I’m placing five 16 foot timbers on the gravel that the floor joists will rest on. My drawing shows the placement of the timbers relative to the floor joists. It also shows the timbers that serve as a wall to retain the stone in position. This drawing will serve as my plan during construction.
You also may be required to anchor the timbers that the shed joists rests on into the ground based on your city/town construction requirements. Furthermore, your city or town may require you to strap your joists to the timbers to prevent shifting. It’s a good idea anyway and I plan on doing this. Your city or town may require you to call these out on the drawing to show that you are in compliance. Some areas are prone to high winds and these requirements help minimize the chances of the shed shifting off of the foundation or flipping over.
Floor: Rim Joists, Joists, Blocking and Plywood Placement
Your city or town will most likely require a drawing showing the layout of the rim joists, joists, blocking and plywood placement. This is easy to sketch out and needs to show the proper overlap of the joists and proper blocking. For a small shed, this is usually not a big deal but your construction official may help you understand the details. Some construction officials are completely overwhelmed and can’t spare a second to assist you. I’ve been fortunate in my encounters to have engaging conversations with the construction department officials. It is best to do your research and with all of the resources available online you can read the construction code to learn how to build a proper structure.
My rim joists are double overlapped and the joists are 12 inches on center. Blocking is installed every 4 feet and 8 feet alternating patterns to ensure that the joists do not twist over from excess weight. With joists that are 12 inches on center you will have a block installed perpendicular toe nailed into the joist. This blocking placement should be shown on the drawing not only for your application but for your cut list. The plywood should be installed in a staggered pattern. Cut a piece in half and start with that on your drawing. Then fill in with a full sheet. Take the 4 foot remaining piece and butt that against the full sheet and place a full sheet. This creates a staggered pattern for extra strength.
You may also be required to use joist hangers and they may need to be specified on your drawings. This is a good idea anyway to secure the joists properly to the rim joists.
Walls: Bottom Plate, Studs, Double Top Plate Placement
Check with your construction office to determine what size lumber is required for your shed walls. In my town 2 x 4 lumber is acceptable spaced 16 inch on center. You may be required to use California corners. You may also be required to install wind braces (a metal strip like this Bailey Wind Brace in the shape of a T that fits into a groove cut into the wall at a diagonal). This is why it is important to check with your construction office so you can learn the requirements for your size shed. Understanding the requirements will help you better understand the scope of work. It will also help you know the budget required to build a shed that is in compliance with the construction code.
The walls on my shed are built on 16 inch centers. There is one bottom plate and I’m using pressure treated lumber. I found that sometimes there is water infiltration and when a door is left open or when the wind blows just right. So using pressure treated helps. The studs are topped with a single 2×4 and then overlapped staggered with a second 2×4. This is called a double top plate. This provides extra strength to the perimeter of the structure.
If you have windows or doors you’ll need to use jack studs, king studs, headers and cripple studs for the proper load strength. There are plenty of resources available on this type of construction. Depending upon the size window or door will determine the size header required to absorb the load from above and transfer it to the jack studs. This must be included in the drawing with proper callouts.
Roof Framing: Roof Style, Rafters or Trusses
What roof style did you choose? Is that roof style permitted to be used in your town or in your HOA or your development? Is there a maximum height requirement that you cannot exceed? These are questions that you will need to answer before you proceed with drawings. You can sketch it out and take it to the construction office and review it with the construction official. But, if you have an HOA you may be required to fall within their guidelines. You may also need to obtain an approval letter for your shed design, orientation, and roof style and maximum height.
You may also have deed restrictions that may list permissible styles, maximum height, direction of doors, window requirements and more. If you do not have your deed it is advisable that you locate it and read through it. You may need a lawyer to help you determine if there are restrictions that may limit you. This article is not intended to cover all designs but instead demonstrate how I am doing it and highlighting some concerns.
Are you using rafters or trusses? This will determine the type of construction and it is best that you consult your construction office. For larger sheds or garages you may need to go with trusses. It would be best to consult with an architect who can help you plan your design. For my design as you see in my first photo, I’ll build my own trusses for my gambrel style roof. I also plan on adding a loft, which will in a way provide a bottom cord for a portion of the shed’s roof. My trusses will be installed every 12 inches on center. Several supports will be required to tie the truss members together from front to back to prevent shifting.
Wall Sheathing
The drawing for wall sheathing is important for you but also during building for the integrity of the shed. Much like the staggered pattern for the floor plywood, you may be required to do the same with the walls. I plan on using 7/16″ OSB and will specify that in the drawing. This is acceptable in my town for 16 inch on center studs. You will need to check with your construction office for the requirements and specify that in your drawing. For larger projects a nailing schedule may be required. For my small shed this is not required.
A nail schedule helps you determine what the minimum spacing is for nails and the size of the nail. For instance, in some towns and cities you are required to use a 2 1/2 inch long 8d nail every 4 to 6 inches apart on the seams. And nailing every 8 to 12 inches apart within the interior of the sheet. This will vary from city to city and state to state based on weather patterns and seismic activity. The nailing schedule will being more vigorous if you will with higher wind speeds.
Roof Sheathing
I plan on using 7/16″ OSB for the roof sheathing. This is acceptable for 12 inch on center truss spacing in my town. You will need to check with your city or town requirements to determine what type and size sheathing you are permitted to use for your roof sheathing. If you have rafters or trusses that are 24 inches on center you may be required to use 3/4 inch OSB or plywood. The type of sheathing and its thickness should be called on on your roof sheathing drawing.
Disclaimer
This is not intended as a blueprint. Nor is it intended as legal advice nor is it intended as instructional advice. I am sharing my process so you may determine what you need to know and have a professional assist you. Professionals who you may need to contact could include an architect, a professional engineer, a surveyor, a general contractor or anyone in the trades who can help with construction. You may even need to contact someone who can grade your land or compact your soil prior to building. It is possible that the area you intended to build is part of a buffer zone for wetlands or protected grounds.
You may need to contact a lawyer for any number of reasons, which could include reviewing the deed and identifying restrictions. Restrictions could be part of the development zone even though you may not be in an HOA. Perhaps you are in a historical zoned area and your building must adhere to the style of the era. These zoned areas are created to preserve the look so that new buildings and renovations do not clash with the other buildings in terms of elevation style or even color and height.
Do It Yourself Build a Shed Series
To learn more about this series check out the DIY Build a Shed Series here.

Picked out for you
Do It Yourself or Hire a Contractor – By U Do It
The Art of Doing without Knowing – By U Do It

Garage door wont close unless I hold the button down – By U Do It
My Pressure Won’t Stay Running – How to Fix – By U Do It
My Pressure Washer Won’t Start – By U Do It

Briggs & Stratton Pressure Washer Starts But Suddenly Stops – By U Do It

Replacing an Edger Blade is Easy with the Right Tools Video – By U Do It

Save money by rebuilding your grill burners – By U Do It
Repair a Leaky Gutter with Flex Seal – By U Do It

Replace your air filter as part of your regular maintenance – By U Do It
Design of the Day

Follow U Do It on Social Media


What’s next? Check out About U Do It, History of U Do It, and Mrs U Do It to learn even more about U Do It.