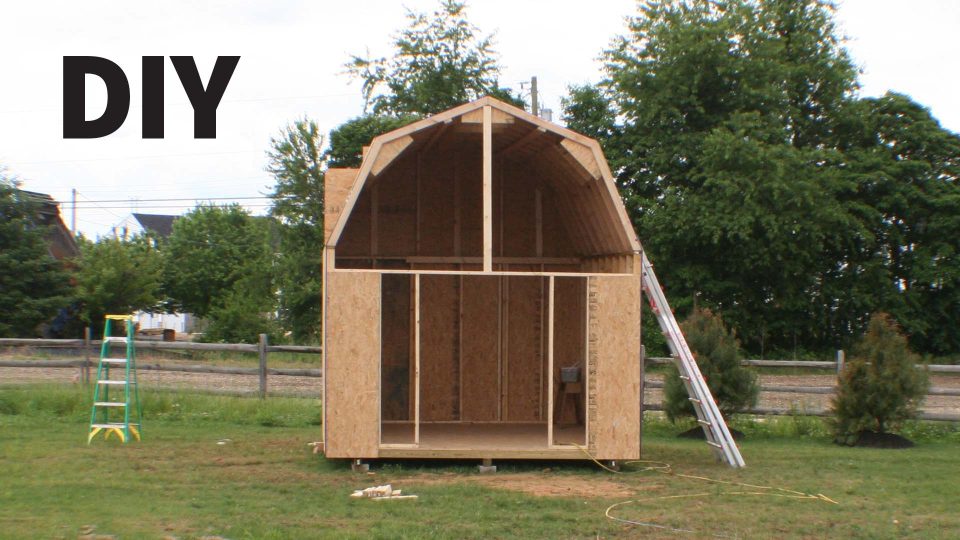
This is a continuation of Do It Yourself Build a Shed – Where to Start where we chose to build a 12′ x 16′ shed with 10′ high walls and a 6′ high gambrel roof with an 8′ deep loft. This article may help you discover your shed specifications along with your own research. The steps I go through in Planning and Estimating may help you understand:
- What materials do you need
- What tasks are necessary
- How much time is necessary
- What equipment and tools do you need
- What are the costs you will incur
Planning
Planning requires you to pick an area on your property to install the shed. For some, this may be simple but for others, this can be complex. If you live in the mountains, you may have rock formations preventing you from installing a shed in a manner typical for most others. I cannot help with these situations but reading through this may help you understand what questions you need to ask of someone with experience, like a licensed contractor.
Once you know where you want to build your shed you can begin with the design. The design can start with shed specifications, which I go into great detail in the following section. You will want to decide on the look of your shed as well. The look will determine extra construction steps that you must consider when purchasing material. For instance, you may want three windows with shutters. You may want a stucco exterior instead of traditional siding.
Estimating Worksheet
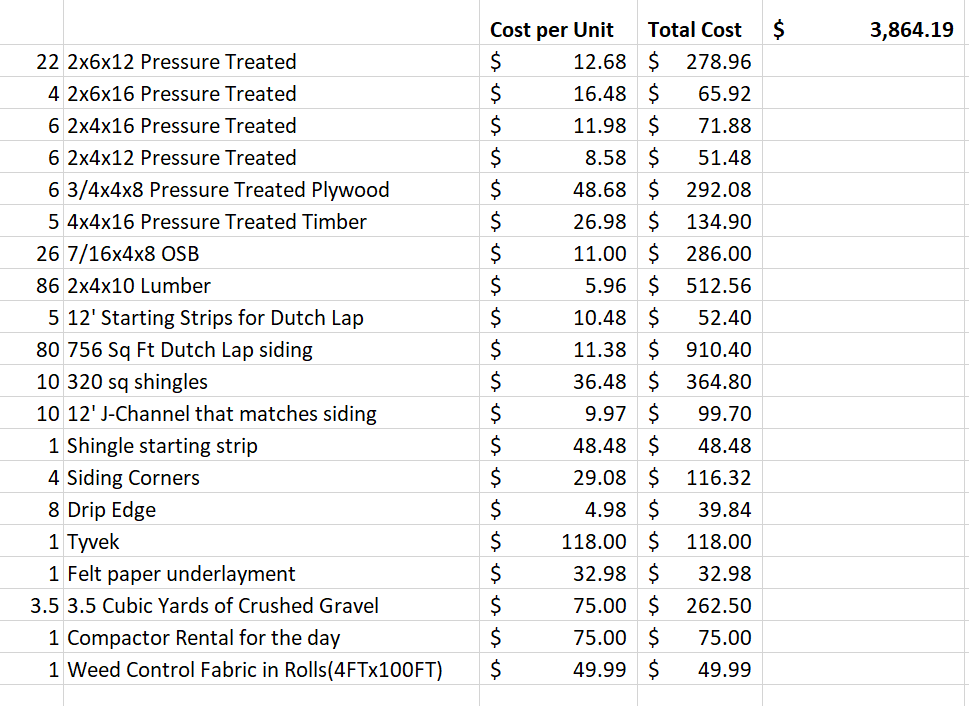
You’ll want to create a worksheet or document that lists all of the materials that you need, the cost per unit, and the total cost as I did below. These costs will not be your costs. Consider these prices obsolete. The point of this is to provide you with a vision of how to track your material costs. You’ll also want to include any new tools that you’ll need to purchase and rent as well as delivery costs.
There are references that you’ll read later regarding fasteners. It’s one of those things that you can easily overlook in estimating. But, they add up. Especially, when you purchase a box of 2,000 collated 3 1/2″ framing nails, a box of coiled roofing nails, and a box of 1 1/2″ sheathing nails. And there are also unknown costs that you will encounter as it is nearly impossible to estimate a project perfectly.
CALL BEFORE YOU DIG
One important note is to call before you dig. Sometimes this service marks the area based on the existing plans, which may have changed. This would not necessarily help you if one agency didn’t update another agency. I know on our last property the cable company installed a new cable line for us. When I called 811 they came out and marked the original location of the cable line and had no knowledge of the new line. The area with the cable line wasn’t important to me since I wasn’t digging in the area. But, this simply highlights that this service is only as good as its data at times. The best service is where they come out with cable and pipe tracers and mark the area based on detected signals.
Shed Specifications
The 12′ x 16′ shed specifications are as follows:
- 12′ wide
- 16′ deep
- 10′ walls
- 6′ high gambrel roof
- 8′ deep loft towards the front half of the shed
- Flooring (slab or wood decking)
- Slab 12′ x 16′ x 4″ Concrete slab
- Wood decking 12′ x 16′ x 6″ with 3/4″ plywood
Slab
This is the case where we choose to pour a concrete slab. For me, this will be new territory and I need to decide if this is something that I can accomplish on my own. I have no doubt that I am capable, but again, it is something new that I’ve never done before. To do this yourself you’ll need a way to mix the concrete fairly quickly and pour it onto the slab area. You may want to break up the slab work into sections so that you can manage them. It will take you approximately two to four minutes to mix an 60lb bag of concrete and pour it into the intended area. At four minutes a bag for 140 bags for the footings will require about 10 hours time.
Preparation
You need a tool to compact the disturbed soil down. You can use a hand-held tamper but it may be better to use a contractor-grade compactor. Having lumber and stakes on hand for the batter boards will help speed up the process of staking out the area. Using a 3-4-5 triangle to ensure squareness will help to get your slab as square as possible. Obviously, a shovel and a wheelbarrow will be useful tools to aid in the clearing of the slab area. But, you will want to consider what to do with the cleared topsoil. One possibility is to donate it to someone who is looking for topsoil or fill dirt. You can mention such requests on Facebook Marketplace. Sometimes, homeowners want to build a raised bed garden or a berm and this would be perfect.
- Stake out the area with batter boards and mason’s line to mark exact corners and perimeter
- Clear the ground of four inches of top-soil and leveled
- Compact the ground with a compactor
Footings
This will require a shovel and some way of moving the dirt away from your area, such as a wheelbarrow. Doing this by hand will take a lot of effort and you could run into several obstacles. You could run into irrigation lines, a septic field, a sesspool, power lines, a well-line supply line, or other forms of utilities for your home. You may have boulders in your yard that may require drilling into the rock and hammering wedges to break it apart. The most common obstacle that you may encounter could consist of roots from trees or buried stumps leftover from felled trees. A lot of patience is required for this and some uncomfortable work on your knees with a reciprocating saw.
- Dig 8″ deep x 20″ wide footings within the interior perimeter of the slab area (construction code may require 36″ deep footings in my town)
- 139 60lb bags of concrete for footings
Slab Area
Pouring the footings and the slab area can be done together but chances are that it will require multiple days depending on the amount of help you have enlisted. You can mix a bag by hand in a cement mixing tub, which is a lot of muscle work. Or, you can lift a bag into a concrete mixer then add water, and mix (it is best to wear a mask to avoid inhaling the concrete dust). Consider adding reinforcing fibers to the mix according to the manufacturer’s recommendations. You’ll then pour that mixed concrete into a wheelbarrow and dump it into the specified area.
- You’ll need lumber to build the form to retain the concrete as it is poured into the slab area. Depending upon your footings design you may need additional lumber to retain the concrete poured for the footings.
- Cover the area with 6-mil polyethylene plastic and hang down a little into the footing area to block moisture
- Spread 1.5 cubic yards of gravel for a little less than 16′ x 12′ area at 2″ deep
- (54 #3 x 10′) Rebar
- (36) Rebar – Install the rebar every 2′ on the slab area in a grid pattern. Secure the intersections with grid wire and support them with rocks or rebar chairs.
- (12) Double rebar parallel within the footing area with bends at corners. Support the rebar above the ground with rocks or rebar chairs.
- (4) Cross the rebar within the footing area every two feet
- (2) Extra Rebar – Place this rebar within the corners of the footings for added strength.
- (1) Spool rebar wire
- 143 60lb bags of concrete for the slab
Deck on Crushed Gravel Bed
18′ x 14′ gravel bed
- Stake out the area with batter boards and mason’s line to mark exact corners and perimeter.
- Clear four inches of topsoil from the ground and level the area.
- Compact the ground with a compactor.
- Wrap the 18′ x 14′ perimeter with 4″ x 4″ pressure-treated lumber and ensure that the lumber is level.
- Pin half-lap joints together with dowels.
- Install a 4′ piece of rebar with a welded T-head every 4′ to hold it in place into the ground
- This will require you to drill a hole through the 4″ x 4″ lumber
- Requires an area that you route out for the T-head to fit flush into the 4″ x 4″ lumber.
- Lay Fabric Cloth down to reduce plant growth.
- Overlap the cloth by at least 1-foot
- Staple the cloth onto 4″ x 4″ boards
- Dump crushed gravel onto Fabric Cloth
- This size area requires a little less than 3.5 cubic yards of crushed gravel for 4″ thick.
- Calculate 3.5 cubic yards by multiplying (4″/(12″/1′) x 14′ x 18′)/(27-cubic-ft/1-yard) and converting to cubic yards
- Stone spread evenly and level it with the top of the 4″ x 4″ boards.
- Tamp down the stone with a compactor.
- This size area requires a little less than 3.5 cubic yards of crushed gravel for 4″ thick.
Skids
This is part of the deck on a crushed gravel bed. If you pour a slab then this is not applicable.
- (3) 4″ x 4″ x 16′ Skids – Install the skids on stone and ensure they are level
- (13 2′ rebar) Use rebar to secure skids to the ground. Weld the top of the rebar with a 4″ section of rebar. This will keep the rebar from dropping through the skid. You may choose to route out a section of the hole to allow the T-Head to embed flush within the skid.
Decking
This is part of the deck on a crushed gravel bed. If you pour a slab then this is not applicable. The deck consists of 2″ x 6″ floor joists built on top of the skids. You add reinforcements throughout, including but not limited to joist hangers and hurricane straps to tie joists to skids. Add blocking between the floor joists for stability. The deck floor consists of pressure-treated tongue and groove plywood.
- Joists for 12′ x 16′ Deck
- (22+3) 2″ x 6″ x 12′ (actually 11′ 6″) floor joists span the width every 16″ (on center).
- Outer 2″ x 6″ x 11′ 9″ joists at both ends sistered with 2″ x 6″ x 11′ 6″ joists
- The “plus 3″ is for blocking. You should buy an extra three 2″ x 6” x 12′ boards to add blocking.
- (4) Double 2″ x 6″ x 16′ rim joists
- Inner joist 2″ x 6″ x 15′ 9″
- Outer joist 2″ x 6″ x 16′
- (27) Hurricane straps tie every other floor joist to the skid in an offset pattern so that each floor joist has at least one point that is tied to the skids
- (36) Joist hangers – it is best to install joist hangers for extra stability and support to the rim joists.
- (22+3) 2″ x 6″ x 12′ (actually 11′ 6″) floor joists span the width every 16″ (on center).
- Flooring
- (6) 4′ x 8′ x 3/4″ Pressure Treated plywood
- Secure the plywood to the joists with 1 1/2″ nails and screws
Walls
The walls are built with 2″ x 4″ x 10′ studs cut to length so the walls are 10′ tall sitting on a bottom plate with two double top plates. Frame the walls on the deck laying down with the studs on 16-inch centers. Once you finish this you can lift them into place. Ideally, you’ll have a 3 1/2″ framing nailer with 3 1/2″ framing nails. Otherwise, you’ll be nailing a lot by hand. You’ll also want a pneumatic palm nailer to nail in nails that didn’t get nailed in completely.
Bottom Plate
- The bottom plate consists of non-pressure treated 2″ x 4″ lumber.
- (2 2″ x 4″ x 16′) bottom plate – secure the bottom plate to the deck along the 16′ perimeter using 3 1/2″ framing nails.
- (1 2″ x 4″ x 12′) cut to 11′ 5″ to fit between the two other bottom plates. Secure these to the deck at the rear of the floor using 3 1/2″ framing nails
- (1 2″ x 4″ x 8′) is cut in half to 3′ 8 1/2″ and mount to the left and right of the front with 3 1/2″ framing nails to leave a 4′ opening for the doors.
Studs for the Walls
- (52 2″ x 4″ x 10′) studs for the walls toenailed into the bottom plate (a few studs will be cut into cripple studs for above the header where the door opening is)
Double Top Plate
The double top plate consists of non-pressure treated 2″ x 4″ lumber
-
- (4 2″ x 4″ x 16′) is secured to the top of the studs along the 16′ perimeter using 3 1/2″ framing nails (the lower top plate is cut to 16′ where the upper top plate is cut to 15′ 5″ to make room for the 12′ top plate to crossover and nail into the 16′ lower top plate).
- (4 2″ x 4″ x 12′) two are cut to 11′ 5″ to fit between the two other 16′ lower top plates and the other two are cut to 12′ lengths to be secured to the 16′ lower top plates to tie the walls together.
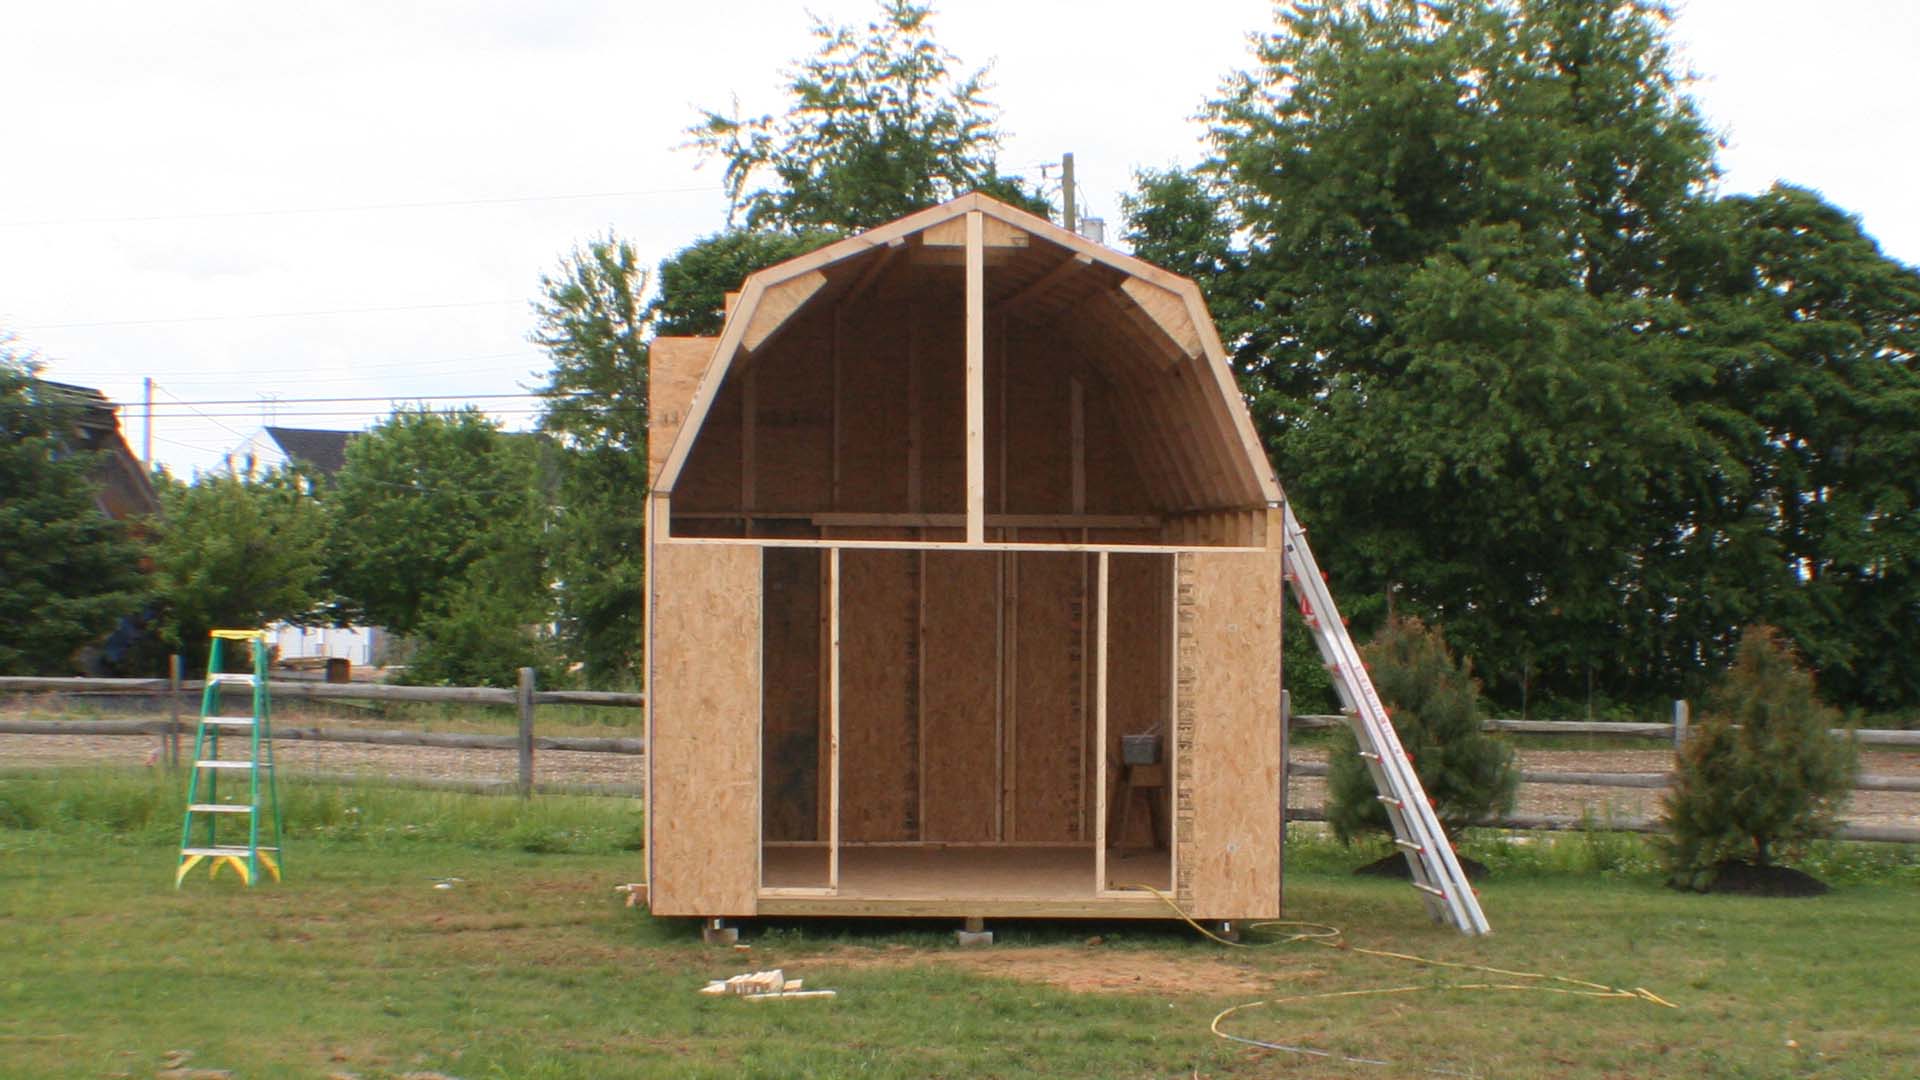
Loft
A loft consisting of 2″ x 8″ x 12′ joists 16″ spans topped with 3/4″ OSB tongue and groove sheets spans the width of the front part of the shed. The roof is a gambrel style with a high angle for the lower rafter. The joists will sit on the top plate of the walls and cut back at an angle that fits within the lower rafter angle.
- (10 2″ x 8″ x 12′) floor joists sitting on the top plate at 16″ centers for the 8′ depth of the loft floor.
- Hurricane straps are used to secure the joists to the top plate.
- 2 of the 10 joists will be cut into sections for blocking to be installed between the joists to keep them from twisting out of place.
- (3 4′ x 8′ x 3/4″) OSB Tongue and Groove sheets for flooring nailed in place using 1 1/2″ nails
Gambrel Roof Rafters
The Gambrel Roof is built using 2″ x 4″ lumber and gussets cut out of OSB. Affix the gussets at all three intersections between the lower rafter and upper rafter and between the upper rafters. Secure the lower rafters to the top plate of the 16′ walls using 3 1/2″ framing nails. Secure hurricane straps between the lower rafters to the top plate. For those lower rafters that are adjacent to the loft floor joists additional nails are driven in to secure them to the joists.
- (26 2″ x 4″ x 10′) lumber is cut down into the 26 lower rafters and 26 upper rafters
- (2 4′ x 8′ x 7/16″) OSB sheets are cut down into the 39 gussets. Secure the gussets at these intersections with 1 1/2″ nails.
- Toenail the rafter assemblies into the 16′ top plate on both sides of the shed walls.
- (4 2″ x 4″ x 16′) Stringers – Install the stringers nailed with 3 1/2″ nails to the inside of the lower rafters and the upper rafters to keep the rafters from shifting.
- Complete the front and rear areas under the rafters with studs on 16″ centers. Install these from the top plate on the walls to the underside of the lower and upper rafters.
Exterior
A decision has to be made whether or not you will go with traditional vinyl siding or T1-11 plywood siding. T1-11 plywood siding can last a long time if you install it per best practices so water sheds from it. But, it also requires maintenance. Vinyl siding can last a lifetime and will rarely require maintenance aside from cleaning mold and algae growth from it. You could also plan to install T1-11 siding with the intention of installing vinyl siding over it at a later date.
T1-11 Siding
If you decide to install T1-11 Siding here’s what will be required. The T1-11 Siding also acts as sheathing, which is what gives the shed its shear strength against lateral movement. At any point later you may choose to install vinyl siding over the T1-11 siding providing that the T1-11 is structurally sound.
- (23 4′ x 8′ x 7/16″) T1-11 Siding
- Paint the sheets first – front and back for added protection against the elements.
- Install the siding vertically overlapping the seams using 1 1/2″ nails around the entire perimeter of the shed from the bottom of the floor joist up to 3/4 of the way up the wall.
- (6) drip edge for T1-11 siding
- This is nailed to the studs around the perimeter. The purpose of this is to prevent water from getting trapped at the top of the T1-11 and rotting it out.
- Install the remainder of the T1-11 sheets vertically along the 16′ walls section up to the roof line. These pieces will probably be cut to a little more than 2′ each. Paint the ends that are cut for additional protection.
- Install the front and back sections of T1-11 siding extended past the lower and upper rafter lines.
- Add the trip work once you finish the roofing and fascia work.
Vinyl Siding
You chose to install vinyl siding. Install OSB first. You may wrap your shed with Tyvek house wrap. Installing the siding will require a ladder once you exceed your reach. You can do this with a ladder. But, one ladder will require you to constantly climb up and down the ladder and move it. It is better to have two ladders and a pick to span the entire length of the wall. In the case of the 12′ wall, you can still use a 16′ pick.
- (23 4′ x 8′ x 7/16″) OSB Sheathing
- Cut one sheet of OSB to a 4′ width and install it lengthwise beginning at the bottom of the floor joist. This will begin the staggered pattern that is best for sheathing installation. Install the sheathing horizontally around the entire perimeter.
- For the next run install a full sheet of 4′ x 8′ OSB horizontally and continue that pattern around the entire shed.
- For the final run for the 16′ walls cut the OSB into strips (probably 2′ 6″).
- And lastly, for the final run for the front and back install the OSB sheets vertically
- It’s optional but using house wrap (like Tyvek) will help shed water from heavy rain events, which will help to keep your OSB sheathing dry. If you do this, you will need capped nails to secure the house wrap.
- Install all PVC fascia and 1″ x 6″ board trim elements around the roof line and along the rafter lines. You may choose to use 2″ x 4″ boards as trim. It is completely up to you and the look you are going for.
- (4 10′) Siding Corners – Install the siding corners on all four corners per the manufacturer’s specifications.
- (5 12′) Vinyl Siding Starting Strips – Install the starting strips along the bottom perimeter.
- (10 12′) J-Channel strips – Install the J-Channel strips along all trim elements.
- (2) Install gable vents on the front and back per your preference
- (756 square feet of siding) Install the siding runs staggering them per the manufacturer’s recommendations.
Roofing
You’ll want to choose the style of shingles for your roof. You can go with a shingle that matches your home’s roof or choose something completely different. For me, I chose a shingle that costs less but has good qualities. You need a starting strip, roof underlayment, roofing nails, drip edge, and shingles. You may want to install a ridge vent but that is up to you.
- (12 4′ x 8′ x 7/16″) OSB sheathing – Install this with 1 1/2″ nails and provide for an overhang on both the front and back ends of the gambrel roof ends.
- (1 36″ x 144′ roll) Roof underlayment – Install roof underlayment with roofing nails
- (8) Drip edge – Install the drip edge along the entire roof line. This will help to minimize the chances of water getting under the shingles.
- (1) 33′ Shingle Starting Strip – Install this with roofing nails.
- (320 square feet) Shingles – Install the shingles per the manufacturer’s recommendations.
Doors
Your shed doors can have a plain look or can have extra architectural details. I like the simple approach of using a 4′ x 8′ sheet of 3/4″ T1-11 siding cut in half to make a set of doors that are 2′ wide by 8′ tall. Wrap the exterior of the doors with 2″ x 4″ pressure treated wood and put in a diagonal piece to give it additional support. I install hinges and hang the doors. Of course, you’ll want a locking mechanism to secure the doors shut.
Costs
You can determine the cost of your materials (factor in taxes and delivery charges or your gas if you are picking up materials with your own vehicle), the cost to purchase new tools or rent, and the cost of the permits. I won’t bother doing that here because the costs associated with these materials today will not be the costs associated with these materials five years from now. But, you are armed with the ability to calculate the costs on your own.
As a DIYer, I can attest to the fact that you’ll never be able to predict the total cost of the job until it’s done. One factor that often gets overlooked is the list of unknowns. For instance, I didn’t know I had to buy marking paint. Sure, the marking paint may only cost $10. But, how many more of these unknowns are awaiting you?
The fun part is making mistakes. There goes that $30 piece of lumber that I just cut short by two inches. So now, you have to go buy another piece but your truck isn’t big enough so you have a delivery fee on top of that. Did you factor in fasteners? We mentioned 3 1/2″ framing nails but did you estimate how many you’ll need? I bought a box of 2,000 framing nails to build my shed. I still have that box of leftover nails in my garage nearly 20 years later. Other fasteners include roof nails and sheathing nails.
Change Requests
Did I mention change requests? When a contractor works with a client, a contract is formed based on the work to be delivered, e.g. building a 12′ x 16′ shed on a slab. When you change your mind and you want to add skylights to the shed, that is a change order and you have to agree to this markup in cost to the overall project. This cost includes buying the skylights and installing them. When you install skylights you also need to box them out properly and add flashing. It’s not simple.
Compare this discussion with the conversation you’ll have with yourself. “I’d like to discuss a change order with you. Sure. Can we add a skylight? Yes. How much will it cost? Just the cost of the skylight. Ok, great!” Now that conversation went pretty well, but you failed to discuss with yourself the extra framing materials (it’s not much and you may already have scraps that will work), the flashing, and any other items that are required.
And, as a DIYer, there is nothing worse than saying “well, I’m doing this myself so let’s get the best of the best materials”. Although it’s true that you are saving on labor because it is your “sweat equity” you are increasing the budget of the project without any accountability. You get lost within the project and lose sight of the overall project cost that is increasing each time you deviate from your original plan. In the end, it is your money and you’ll do what you want. I’m merely pointing out that there is a trap that DIYers fall into and costs can escalate out of control quickly. Learn from my experiences and the experiences of others.
DIY or Contractor
The intention of this article you are reading is to provide you with the relevant information for you to decide if you want to pursue building a shed or garage yourself. But, if you’d like some further information on deciding if you should build it yourself or hire a contractor then I got you covered. I wrote an article on this very topic so I will be brief in this section.
You can amass a tool collection to use on future projects that you plan on doing if you do it yourself. You run the risk of exceeding your budget for various reasons but that’s a conversation you have with yourself. When you hire a contractor, you’ll need clear specifications on what you want to be built and you’ll write different checks throughout the process to the contractor. If all goes well, your out-of-pocket expenses (checks to the contractor) will match the estimate. Sometimes, these things do not go well and there are project overages. Recently, in 2021 and 2022 the big problem was the spike in the cost of materials, labor shortage, and excessively long lead times. These will appear as additional charges and delays to your project depending upon the language within the contract. You may even see surcharges.
Do It Yourself Build a Shed Series
To learn more about this series check out the DIY Build a Shed Series here.

Picked out for you
Do It Yourself Build a Shed – Where To Start – By U Do It
Making our Home Shine with Custom-Built Light Stands – By U Do It

Save money by rebuilding your grill burners – By U Do It
How to paint two tone colors with a laser level – By U Do It
How to install a GFI outlet in basement from start to finish – By U Do It
Repair a Leaky Gutter with Flex Seal – By U Do It
Replace your air filter as part of your regular maintenance – By U Do It
Design of the Day

Follow U Do It on Social Media


What’s next? Check out About U Do It, History of U Do It, and Mrs U Do It to learn even more about U Do It.